Silicon Pads: The Good, The Bad, and The..... Interesting

 I have made silicon pads from caulking for about 3 years for various applications. Sound dampening for the Nickster, bumpers, washers and tubing for the Deagan glockenspiel, stick pads, etc. I've used clear, white, and black, putting in water mixed with dish detergent, mixed it with corn starch, or simply put it between two pieces of paper and pressed until it cured.

Clear seems to be the best for my needs. It' sets up firm, isolates sound, and provides a great rebound for practice pads. White is softer, very pliable, and provides less rebound. Black is extremely soft and pliable, and provides very little rebound. But it isolates the best.

Mixing with detergent causes air bubbles in the final product. Corn starch creates a mess. Just pressing works the best.

 My normal procedure is to place a sheet of paper on a plywood board, squirt the caulking onto the paper, cover it with a second sheet of paper and put another plywood board on top and press. Remove the top plywood and let it cure. After curing it's placed in a tub of hot water for a day or two and then using a stiff wire brush remove the paper. Brushing is the hardest part. Sometimes I place spacers between the two boards to get an exact thickness of the final pad. I use recycled paper that is printed on one or both sides so as not to waste paper. 

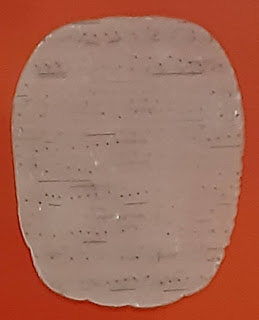
The last batch of pads (for the wood block project) went through this process with one exception: I used paper that was copied not on my inkjet copier but on my laser printer. When I finished the brushing to remove the paper I found that the image from the paper was transferred to the pad.


   This is 'The Interesting' in the title. This opens up a lot of possibilities like making practice pads for Christmas presents for my students, personalized with their name and a drum solo on it. Of course the image is reversed but that can be dealt with during the printing process. I'm sure I'll find other uses for it, but for now I'll just file it in my brain.


Comments

  1. Interesting...I wonder if it would tick to freezer paper or wax paper? Good idea for a gift...you might have a million dollar idea:)

    ReplyDelete
  2. I have found that they make good jar openers. I've had to replace the old rubber ones we had.

    ReplyDelete

Post a Comment

Popular posts from this blog

La Caverna del oro

 One of our first backpacking trips in Colorado was in the Sangre de Christo Mountains. One mountain in particular drew our attention. Marble Mountain was the location of a famous story of a Spanish cave of gold. There are many places on the web that tell this story better than I could, suffice it to say that we wanted to locate it and see the iconic 'Maltese Cross' located at it's entrance.  In 1974 after I got out of the Army we invited some friends to join us on this trip. We parked our car at the trailhead in the Wet Mountain Valley and backpacked up Marble Mountain to 12,000 feet. In one of the culverts we found the entrance to the cave. Maltese Cross at the Caverna del oro It turned out to be a real thing. The large red cross was still visible after 400 yrs. According to legend the Spanish put it there in the 1600's. I did have the courage to crawl into it but only a few feet. After about 10 feet there is a vertical shaft that drops about 750 feet!  The Cross is v...

The Deagan Project: Part II

Escutcheon Pins, Washers and Isolators Most of the pins were bent but easily straightened. Just tapping them on a bench vise did the job. I replaced the one wood screw with a sheet metal screw for the lost pin. For the washers I used silicon caulking compound. Earlier this year I tried making sheets of silicon by applying caulk onto a plastic sheet protector. I placed another sheet on top and rolled it out to the desired thickness. After it cured I took a hole punch for the outside diameter of the size that I needed. The smallest punch was used for the center hole for the pin. In the past I used catheter material for the isolators but when I went to a medical supply store to find the size that I needed I was asked for my doctor's prescription. A prescription?.....Are they afraid that I'm going to insert a piece of plastic into parts of my body just for the...….never mind. OK, so nix the catheter tubes. Since I was working with silicon I tried a di...

The Amadinda

  The Amadinda is an African xylophone originally made from slabs of wood or even large sticks, with or without gourds for resonators. There was no reason for this project other than to see if I could make a simple mallet instrument. The box was made from plywood (which also acted as the resonators) and the bars were made from maple.  Since this was to be a true xylophone, the bars were all of equal width. Tuning was done by cutting the bars to different lengths and removing material from the bottom. Using a router I created a sort of 'stepped pyramid' instead of the traditional arc cut found on marimba or xylophone bars.  Cutting the underside is not only for tuning but it focuses the pitch and creates the characteristic overtones of the instrument. Since I wanted to play this with other 'Western' instruments, I chose to use a pentatonic scale of 2 2/5 octaves (C#,D#,F#,G#,A#,C#,D#,F#,G#,A#,C#,D#). Two people sit on either side of the instrument and strike the ends of ...